| This article needs additional citations for verification. Please help improve this article by adding citations to reliable sources. Unsourced material may be challenged and removed. Find sources: "Go/no-go gauge" – news · newspapers · books · scholar · JSTOR (July 2010) (Learn how and when to remove this message) |

A go/no-go gauge is an inspection tool used to check a workpiece against its allowed tolerances via a go/no-go test. Its name is derived from two tests: the check involves the workpiece having to pass one test (go) and fail the other (no-go).
For example, ISO 1502 sets a standard for screw threads and gauging to test them. It establishes the attribute T as go for the major diameter and the attribute Z as no-go for the pitch diameter. The inspection tool has two threaded components. For example, there would be two female sections on a gauge to test a threaded male workpiece such as a screw. If the major diameter of a screw is too large, it will not fit in the T test thread at all (fail). If the major diameter is too small, the fit is sloppy (fail). If the thread has been cut too deep, it screws into the Z test thread (fail). If it is the right size and only does about three turns, the fit is right (pass).
A go/no-go gauge is an integral part of the quality process that is used in the manufacturing industry to ensure interchangeability of parts between processes or even between different manufacturers. It does not return a size or actual measurement in the conventional sense, but instead returns a state, which is either acceptable (the part is within tolerance and may be used) or unacceptable (the part must be rejected).
They are well suited for use in the production area of the factory as they require little skill or interpretation to use effectively and have few, if any, moving parts to be damaged in the often hostile production environment.
Plug gauge


These gauges are referred to as plug gauges; they are used in the manner of a plug. They are generally assembled from standard parts, where the gauge portion is interchangeable with other gauge pieces (obtained from a set of pin type gauge blocks) and a body that uses the collet principle to hold the gauges firmly. To use this style of gauge, one end is inserted into the part first, and depending on the result of that test, the other end is tried.
In the right image, the top gauge is a thread gauge that is screwed into the part to be tested, the "GO" end should fully enter the part; the "NOT GO" end should not. The lower image is a plain plug gauge used to check the size of a hole; the green end is the go, and the red end is the no-go. The tolerance of the part that this gauge checks is 0.30 mm, where the lower size of the hole is 12.60 mm and the upper size is 12.90 mm, every size outside this range is out of tolerance. This may be initially expressed on the parts drawing in a number of styles; three possibilities may be
- 12.75±0.15 mm
- 12.60+0.30
−0.00 mm - 12.90+0.00
−0.30 mm
Pin gauge

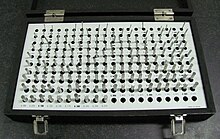
The associated image is a set of pin gauges used to measure holes only a few millimeters in diameter.
Pin gauges come in many classes and X, XX, ZZ, are a few examples. They are Go and NO Go pins, these pins can also have custom modifications. They are also used for the go/no-go assemblies needed in production manufacturing.
Snap gauge


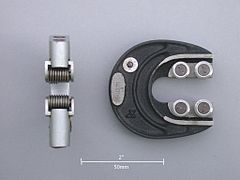
Snap gauges are often used when a large quantity of work pieces must be inspected. The snap gauge has four anvils or jaws, the first one or pair (outermost) are set using the upper limit (tolerance) of the part and the inner set adjusted to the lower limit of the part. A correctly machined part will pass the first set of jaws and stop at the second—end of test. In this manner, a part may be checked in one action, unlike the plug gauge that needs to be used twice and flipped to access the second gauge. The first go/no-go snap gage for checking thread rolls was invented in 1943 to speed production of parts during WWII.
Other styles
Once the concept is understood, the principle of operation can lead to all manner of designs where internal grooves, keyways, splines, etc. may be measured in a simple yet effective manner. These will often be made to order by the toolmakers, or a related skilled tradesman.
Go/no-go gauges play an integral part in setting the correct headspace during gunsmithing. In order for the chamber to be in-spec, the bolt must close without resistance on the go gauge, but it must not close completely on the no-go gauge. In addition, there is usually a third gauge called FIELD that is slightly larger than the no-go gauge. Since bolt and chamber lugs eventually stretch with use, the bolt may start to close on the no-go gauge. If the bolt also closes fully on the field gauge, such a gun is considered unsafe due to high risk of shell case rupture if the cartridge's length happens to be on the shorter end of the spec.
A special match-grade go gauge can also be employed to verify a particularly tight, or shorter-than-SAAMI specification chamber length. Such gauges are usually specially ordered from chamber-reamer manufacturers. This minimizes case stretch or end-play in order to best control the positioning of an unfired round prior to its firing in a match-grade chamber. Such chambers are also usually cut to tighter dimensions in the case-neck area. Thus, a standard go gauge may not actually chamber as easily due to these reduced dimensions, even if they are cut properly.
See also
References
- "ISO 1502:1996: ISO general-purpose metric screw threads -- Gauges and gauging". 1996.
- ISO general-purpose metric screw threads- Gauges and gauging Archived 2016-09-22 at the Wayback Machine Retrieved 2016-5-13.
- Hoffman, Edward G. (1985). Fundamentals of Tool Design. Dearborn: Society of Manufacturing Engineers (SME) Publications/Marketing Division. pp. 499–502. ISBN 0-87263-134-6.
- Burghardt, Henry D. (1919-01-01). Machine Tool Operation ... McGraw-Hill book Company, Incorporated.
- "Snap Gauge".
- "Snap Gage for Checking Threads Combines Go-no-Go Limits" Popular Mechanics, December 1943 left side of page
External links
- Limit (GO & NO GO) Gauges
- https://books.google.com/books?id=FxtWAAAAMAAJ&pg=RA12-PA15
- Technical Specification on Plug (GO / NO GO) Gauges Archived 2014-10-25 at the Wayback Machine
- Using Go and No Go Gages